CURRENT CONTROL OF GRAY IRON TENSILE PROPERTIES
By
The Quality Control Committee
of the
Cast Iron Division
of the
American Foundrymen’s Society
Principle Author
Roy W. Lobenhofer
Lobenhofer Consulting, Inc.
“How good does control need to be?” is a question that many technical foundrymen ask themselves. While improved control is always desirable, in reality every foundry must deal with limited resources. It’s important to spend those resources on improving the control of variables that will most significantly benefit the operation. Realizing the importance of this question about degree of control, the Quality Control Committee of the Cast Iron Division of the American Foundrymen’s Society decided to try to determine what degree of control is being achieved in today’s iron foundries.
As one of the variables every iron foundry must control is the tensile strength, it was decided to start with that variable. A survey form was developed which asked foundries to report the only the degree of variability they experienced in tensile strength. The foundries were requested to report only their degree of variability to avoid possible concerns about proprietary information. The form also requested information about the operations that might effect the variability tensile strength. It was decided that in order to make the information consistent that the information would only be sought on class 30 gray iron, the most commonly poured grade of gray iron. The survey and cover letter that was sent with it are attached as appendix A.
Even with the limited response, interesting information was obtained from the survey. Obviously, the primary information sought was the variability being experienced in tensile strength. The survey revealed that the average standard deviation to be 2256 psi. The maximum and minimum reported were 3845 and 1120 respectively.
One of the suspected contributing factors to the variability was whether the tensile testing was done in-house or by commercial laboratory. 15 of the operations indicated that they used commercial laboratories. The average standard deviation of the tensile for those operations was 2330. The 17 foundries indicating they performed their own tensile testing had an average standard deviation from their tensile testing of 2190 psi.
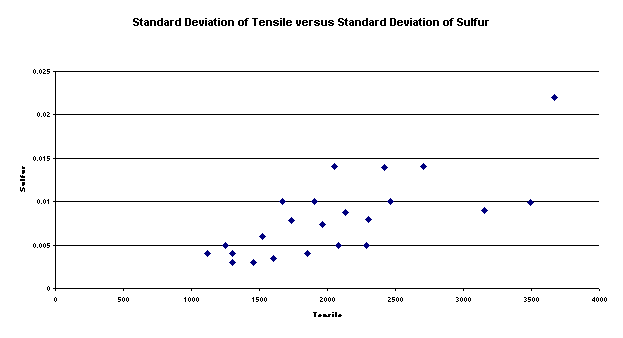
Linear regression analyses were performed comparing all of the quantifiable data to the standard deviations. The correlation coefficient measures how well the developed formula explains the variation. The variable that showed the best correlation was sulfur. Figure 2 shows the scatter of the sulfur standard deviation in relation to the tensile standard. There were 24 foundries that reported sulfur standard deviations and the correlation coefficient of the equation .534.
The next highest correlation was .282 from the equation relating the standard deviation of the silicon as determined by thermal analysis to the standard deviation of the tensile strength.
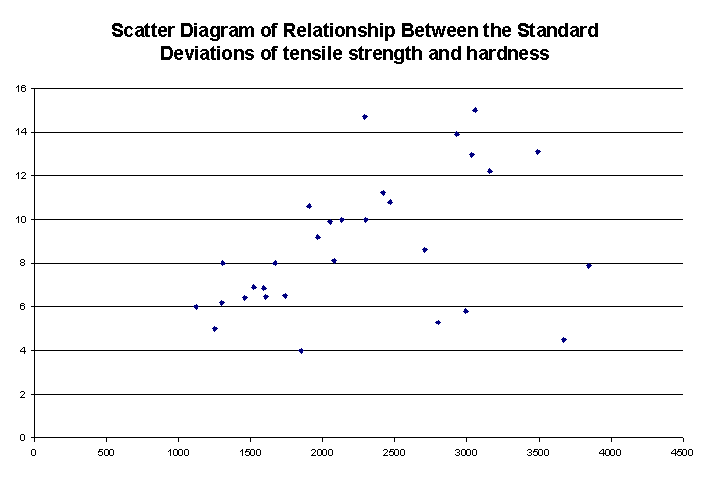
It was believed that there would be a high correlation between the amount of variation experienced in the hardness readings and the tensile strength. The correlation coefficient actually found .167. The scatter diagram of that relationship is shown in figure 3.
Limited Response
The limited response to the survey was naturally disappointing. It was believed by the members of the committee that the information requested would be readily available in most of today’s iron foundries and a good response was expected from survey. Previous committee survey’s sent using the AFS database have had far higher returns than this. There are a number of possibilities for the poor return rate.
1) Obviously, a poorly worded survey form can
frustrate the person trying to fill it out and the form is likely to end up
being thrown out. On occasion people developing surveys can fall into the trap
of knowing exactly what they mean because they had worked on it for so long,
but it can be very confusing to the person trying to fill it out. In order to
avoid this happening, the committee, after finishing developing the form had it
sent, to colleagues who were not involved with its development to see if there
were any misunderstandings. As the colleagues had no problem interpreting the
survey, the committee felt that had eliminated the concern.
2) Another common problem with surveys is that they get sent to the wrong people. As the AFS database used for the surveys similar to this that had far greater returns than this, it would seem that this would not be a viable reason for the poor return on this one.
3) It is well known that surveys requiring the responders to spend a great deal of effort developing the information asked for do not get high responses. With the computers in use in foundries today, the emphasis placed on statistical tracking, and the importance of control of variables, it was believed that most foundries would have easy access to the desired information. Investigations outside of the committee have shown that belief was very likely erroneous. The information was not readily available in a number of foundries. That being the case, it is easy to understand that the people asked to respond would not believe seeing the results of the survey would not be beneficial to them.
Overall Results
The overall “average” standard deviation of the tensile
strength shown from the survey results may be better/lower than is the real
“average” of all foundries producing class 30 gray iron. As indicated above the
low return of surveys may have been caused because not many foundries track the
variability of the tensile strength. If that is the case, then it is almost
certain the foundries that are not tracking it are not placing a great deal of
emphasis on controlling it. Simple logic would then lead to the conclusion,
that there would be a likelihood that such foundries would have a higher
standard deviation.
In-house Testing versus Commercial Laboratories
While the average of the tensile standard deviations of the foundries that did there own tensile testing was lower than those of the foundries that used commercial laboratories, the difference was not statistically significant. While one would assume that the results obtained from a commercial laboratory would be less variable than those done by a foundry, there are a number of reasons why this may not be the case in reality.
1) The foundries that can afford the capital equipment to do there own tensile testing would tend to be the larger operations. Such larger operations would be more likely to have sophisticated controls in place that could lead to better control of the tensile properties.
2) When tensile testing is done in-house, it is easier to retest questionable results. Naturally, eliminating “flyers” from the data will reduced the resulting standard deviations.
3) Commercial laboratories typically test a wider range of materials than in-house laboratories. This should allow the in-house testing procedures to be fine tuned to produce less variable results.
Melting Procedures
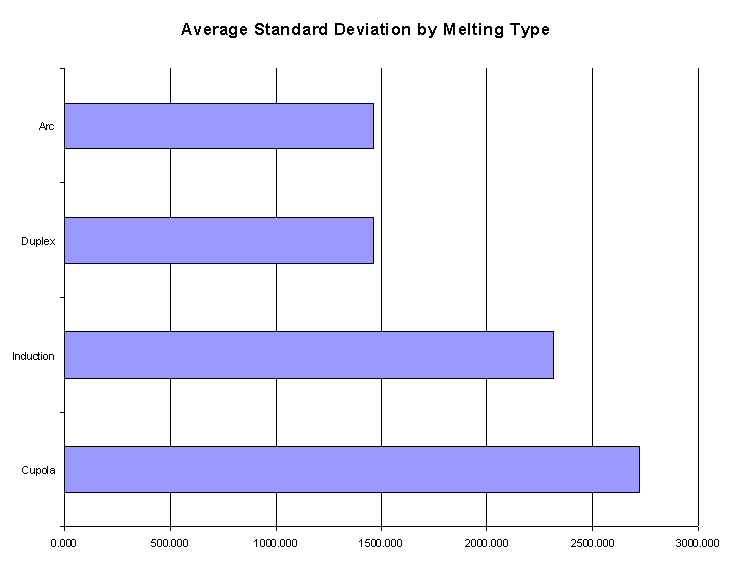
As there was only one reporting foundry that used an arc furnace, there can be no statistical significance attributed to its having the lowest average standard deviation. The differences in averages among the other types of melting are all statistically significant at over a 90% confidence level.
Once again there is logic to these results. The duplexing melting system is usually associated with larger operations that would be expected to have better control equipment. The balancing effect of duplexing furnaces also should improve control. While the cupola and induction furnace both melt iron, the chemical reactions that are part of the cupola melting usually equate to more difficult control.
Linear Relationships
The information from performing the regression analyses was confusing. Regression analyses were performed comparing the standard deviations all available variables to the standard deviation of the tensile strength. The results did not provide significant insights. The lack of a strong relationship between the standard deviations of the hardness readings and the tensile strength (correlation coefficient of .167) was as surprising as the good correlation (correlation coefficient of .533) between sulfur.
Conclusions
It’s difficult to draw any significant conclusions from such a small response. Perhaps the cause of the small response is the most significant factor of this entire exercise. It is theorized that iron foundries are not tracking their degree of control of their tensile strength. If they are not tracking their control on a variable that is specified, it can be deduced that they would also not track other non-specified variables in the operation.
The
reduction of process variation has been shown to be the key to improved quality
performance and has been extolled by the giants of the quality movement such as
Demming; however, with these results it is appropriate to conclude with a quote
from Peter Drucker:
|
“Don't measure it and your people know you're not serious
about delivering it.” |
|
Furnace |
Average
Standard Deviation |
Number |
|
Cupola |
2720 |
10 |
|
Induction |
2315 |
15 |
|
Duplex |
1465 |
6 |
|
Arc |
1459 |
1 |
Table 1 – Melting
Method

Figure 1
 Figure 2

Figure 3
AFS CAST IRON DIVISION’S
QUALITY CONTROL COMMITTEE’S
SURVEY OF IRON CONTROL
STANDARD
DEVIATIONS OF CLASS 30 TENSILE TESTS
NUMBER OF TESTS REPRESENTED IN
SAMPLE _________ TIME SPAN ________
STD. DEV. OF TENSILE TESTS _______
STD. DEV. OF BHN OF TEST BARS
______
RESULTS FROM ______ IN HOUSE
TESTING _____ COMMERCIAL LAB
MELTING - CUPOLA ____ INDUCTION
____ DUPLEX ______
IN HOUSE THERMAL ANALYSIS RESULTS
STD. DEV. OF C _____
STD. DEV OF Si
OTHER CHEMICAL ANALYSIS
SOURCE _________________________
|
ELEMENT |
STD. DEV. |
ELEMENT |
STD. DEV. |
|
|
|
|
|
|
|
|
|
|
|
|
|
|
|
|
|
|
|
|
|
|
|
|
|
|
|
|
|
|
|
|
|
|
|
|
|
|
|
|
|
|
|
|
|
|
|
|
|
|
PLEASE LIST STANDARD DEVIATIONS OF
ANY OTHER TESTS WHICH YOU DEEM SIGNIFICANT ON AN ADDITIONAL SHEET.
OPTIONAL:
CONTACT
PERSON’S NAME _________________
COMPANY
NAME __________________________
TELEPHONE
NUMBER ____________________
PLEASE FAX RESULTS TO 847.806.1229
Dear Foundryman:
The AFS Cast Iron Division’s Quality Control Committee (5-J) is trying to quantify the control being exercised in today’s iron foundry. In order to begin this endeavor it was decided to look at the control being exercised in producing the class 30 gray iron test bars. To help us in this matter, we are requesting that you fill out the enclosed form regarding the standard deviation of your test results for a number of consecutive tests and a little information about how the testing was accomplished.
We realize that no one will want to release information that might be sensitive to their operation; therefore, we are only asking questions regarding the degree of control being exercised. We don’t expect you to run any special tests. We hope that all of the information will merely come from your records.
We would like the tensile tests you report to be consecutive (no fair picking out only the good ones) and a minimum of twenty-five test bar results. If you don’t track the chemistry information directly with your test bar results, we ask that you make the report of that information covering your data for the same time period instead of just using the same number of tests.
While it isn’t necessary, we would like you to include your name and telephone number so that a follow up can be made if there is any clarification of information that needs to be done.
It is our hope to turn this information into a Modern Casting article that will give you either bragging rights with your management about what a good job you’re doing controlling your iron or ammunition to get what you need to improve control.
If you have any questions regarding this activity or the other activities of the Cast Iron Quality Committee, please feel free to call me at the number listed below.
Sincerely,
Roy Lobenhofer
847.806.1212
On behalf of the
Cast Iron Division’s
Quality Control Committee
RAW DATA
|
Foundry |
#
Tests |
Time
Span - Yr |
Std
Dev Tensile |
Std
Dev BHN |
1=Commerical
Lab 2=in house |
Melting
1=cupola
2=Induction
3=duplex |
Thermal
C |
Thermal
Si |
Chem
Source |
C |
Si |
|
a |
46 |
0.083333 |
1852 |
4 |
2 |
3 |
0.012 |
0.022 |
Leco/Spec |
0.015 |
0.035 |
|
b
|
25 |
0.333333 |
3671 |
4.5 |
2 |
1 |
0.058 |
0.108 |
spec |
na |
0.2 |
|
c |
67 |
0.083333 |
1250 |
5 |
2 |
3 |
0.025 |
0.048 |
spec |
x |
x |
|
d |
56 |
0.166667 |
2800.1 |
5.2876 |
2 |
2 |
0.0825 |
0.11973 |
? |
x |
x |
|
e |
25 |
0.016438 |
2990 |
5.8 |
2 |
1 |
0.02 |
0.05 |
x |
x |
x |
|
f |
35 |
0.083333 |
1120 |
6 |
2 |
3 |
0.017 |
0.039 |
spec |
x |
x |
|
g |
41 |
0.10137 |
1300 |
6.2 |
2 |
1 |
x |
x |
Leco/Spec |
0.04 |
0.074 |
|
h |
39 |
0.035616 |
1459 |
6.43 |
1 |
Arc |
0.046 |
0.049 |
spec |
x |
x |
|
I |
30 |
0.038356 |
1602 |
6.464 |
2 |
2 |
x |
x |
spec |
0.0466 |
0.048 |
|
j |
43 |
0.054795 |
1738.5 |
6.52 |
1 |
3 |
0.033 |
0.124 |
spec |
x |
x |
|
k |
25 |
0.117808 |
1590 |
6.86 |
2 |
2 |
0.003 |
0.002 |
x |
x |
x |
|
l |
66 |
0.083333 |
1522 |
6.9 |
2 |
3 |
0.028 |
0.047 |
spec |
x |
x |
|
m |
25 |
0.208333 |
3845.2 |
7.88 |
2 |
2 |
x |
x |
Leco/Spec |
0.07 |
0.09 |
|
n |
63 |
0.083333 |
1305 |
8 |
2 |
3 |
x |
x |
? |
0.013 |
0.025 |
|
o |
27 |
0.583333 |
1668 |
8 |
1 |
1 |
0.04 |
0.07 |
spec |
x |
x |
|
p |
59 |
0.25 |
2078 |
8.1 |
1 |
2 |
x |
x |
spec |
0.074 |
0.077 |
|
q |
33 |
0.083333 |
2708 |
8.6 |
1 |
1 |
0.04 |
0.12 |
spec |
0.056 |
0.111 |
|
r |
50 |
0.5 |
1964.854 |
9.203 |
1 |
2 |
0.022 |
+ |
spec |
0.139 |
0.046 |
|
s |
46 |
0.083333 |
2050 |
9.9 |
2 |
2 |
0.033 |
0.047 |
spec |
0.063 |
0.096 |
|
t |
25 |
0.08 |
2132.2 |
10 |
1 |
2 |
0.1552 |
na |
spec |
na |
0.1662 |
|
u |
26 |
0.083333 |
2300 |
10 |
1 |
2 |
0.027 |
0.025 |
spec |
x |
x |
|
v |
38 |
0.084932 |
1905.84 |
10.6 |
1 |
2 |
0.02 |
0.06 |
? |
x |
x |
|
w |
25 |
0.583333 |
2466.7 |
10.8 |
1 |
2 |
0.042 |
0.061 |
Com.
Spec |
x |
x |
|
x |
741 |
1.25 |
2418 |
11.23 |
1 |
1 |
na |
na |
in
house |
0.0262 |
0.1041 |
|
y |
25 |
0.076923 |
3158 |
12.2 |
1 |
2 |
0.038 |
0.106 |
Spec |
x |
x |
|
z |
31 |
0.125 |
3031.85 |
12.98 |
1 |
1 |
0.02 |
x |
spec |
x |
0.08 |
|
aa |
453 |
0.125 |
3490 |
13.1 |
2 |
1 |
x |
x |
Leco/Spec |
0.024 |
0.05 |
|
ab |
328 |
1.416667 |
2928 |
13.9 |
2 |
2 |
0.06 |
0.11 |
spec |
x |
x |
|
ac |
29 |
0.083333 |
2290 |
14.7 |
2 |
2 |
0.04 |
0.06 |
spec |
0.084 |
0.09 |
|
ad |
24 |
0.041096 |
3059 |
15 |
1 |
1 |
0.05 |
0.07 |
x |
x |
x |
|
ae |
22 |
0.5 |
1618.6 |
x |
2 |
2 |
0.0347 |
0.0362 |
x |
x |
x |
|
af |
100 |
1 |
2865 |
x |
1 |
1 |
0.03 |
0.04 |
x |
x |
x |
|
Foundry |
Mn |
S |
P |
Cr |
Ni |
Cu |
Al |
Ti |
V |
Sn |
Mo |
Sb |
Nb |
Zr |
|
a |
0.033 |
0.004 |
0.003 |
0.011 |
0.002 |
0.009 |
0.001 |
0.006 |
x |
0.002 |
0.002 |
na |
na |
na |
|
b
|
0.04 |
0.022 |
0.007 |
0.007 |
0.01 |
0.07 |
na |
na |
na |
na |
na |
na |
na |
na |
|
c |
0.029 |
0.005 |
0.001 |
0.018 |
0.003 |
0.01 |
x |
0.001 |
x |
x |
0.001 |
x |
x |
x |
|
d |
0.0324 |
x |
x |
x |
x |
x |
x |
x |
x |
x |
x |
na |
na |
na |
|
e |
x |
x |
x |
x |
x |
x |
x |
x |
x |
x |
x |
na |
na |
na |
|
f |
0.02 |
0.004 |
0.004 |
0.012 |
0.005 |
0.016 |
x |
0.002 |
x |
x |
0.003 |
x |
x |
x |
|
g |
0.026 |
0.004 |
0.0028 |
+ |
+ |
0.014 |
+ |
0.0035 |
+ |
+ |
+ |
na |
na |
na |
|
h |
0.017 |
0.003 |
0.004 |
0.013 |
x |
0.009 |
x |
0.0014 |
x |
x |
x |
x |
x |
x |
|
I |
0.0254 |
0.0034 |
0.0015 |
0.0043 |
0.0017 |
0.026 |
0.0022 |
0.0011 |
0.0033 |
x |
0.0025 |
na |
na |
na |
|
j |
0.0588 |
0.0078 |
0.0024 |
0.0079 |
0.0055 |
0.0187 |
0.0005 |
0.0031 |
x |
0.0023 |
0.0048 |
0.0012 |
na |
na |
|
k |
x |
x |
x |
x |
x |
x |
x |
x |
x |
x |
x |
na |
na |
na |
|
l |
0.019 |
0.006 |
0.002 |
0.016 |
0.004 |
0.012 |
x |
0.001 |
x |
x |
0.004 |
x |
x |
x |
|
m |
x |
x |
x |
x |
x |
x |
x |
x |
x |
x |
x |
na |
na |
na |
|
n |
0.026 |
0.003 |
0.002 |
0.013 |
x |
0.015 |
x |
0.0009 |
0.001 |
0.0006 |
0.006 |
0.0013 |
0.001 |
0.0005 |
|
o |
0.03 |
0.01 |
0.003 |
0.02 |
0.006 |
0.03 |
x |
x |
x |
0.002 |
x |
x |
x |
x |
|
p |
0.019 |
0.005 |
0.005 |
x |
x |
0.025 |
x |
x |
x |
0.007 |
0.017 |
na |
na |
na |
|
q |
0.037 |
0.014 |
0.012 |
0.0095 |
0.005 |
0.0148 |
0.0065 |
0.003 |
* |
0.02 |
0.003 |
x |
x |
x |
|
r |
0.019 |
0.0074 |
0.0013 |
0.011 |
0.0191 |
0.0541 |
0.0018 |
0.0007 |
na |
0.0025 |
0.0306 |
na |
na |
na |
|
s |
0.05 |
0.014 |
0.005 |
0.07 |
0.01 |
0.1 |
0.003 |
0.006 |
0.003 |
0.003 |
0.02 |
x |
x |
x |
|
t |
0.0686 |
0.0088 |
0.0171 |
na |
na |
0.1048 |
na |
na |
na |
na |
na |
na |
na |
na |
|
u |
0.021 |
0.008 |
0.047 |
x |
x |
x |
x |
x |
x |
x |
x |
na |
na |
na |
|
v |
0.06 |
0.01 |
0.01 |
0.03 |
0.03 |
0.07 |
x |
x |
x |
x |
x |
na |
na |
na |
|
w |
0.047 |
0.01 |
0.0078 |
0.014 |
x |
x |
x |
x |
x |
x |
x |
na |
na |
na |
|
x |
0.036 |
0.0139 |
0.0134 |
0.0483 |
0.0182 |
0.1024 |
0.0053 |
0.0034 |
0.007 |
0.0121 |
0.0039 |
na |
na |
na |
|
y |
0.08 |
0.009 |
0.004 |
0.022 |
0.047 |
0.059 |
0.001 |
0.002 |
0.001 |
0.003 |
0.038 |
na |
na |
na |
|
z |
x |
x |
x |
x |
x |
x |
x |
x |
x |
x |
x |
na |
na |
na |
|
aa |
x |
0.0099 |
0.0111 |
0.01 |
x |
0.028 |
x |
0.001 |
x |
0.0031 |
0.0057 |
x |
x |
x |
|
ab |
x |
x |
x |
0.013 |
0.0053 |
0.042 |
x |
x |
x |
x |
0.019 |
na |
na |
na |
|
ac |
0.07 |
0.005 |
0.009 |
0.06 |
0.04 |
0.09 |
0.002 |
0.003 |
0.002 |
0.003 |
0.002 |
x |
x |
x |
|
ad |
x |
x |
x |
x |
x |
x |
x |
x |
x |
x |
x |
na |
na |
na |
|
ae |
x |
x |
x |
x |
x |
x |
x |
x |
x |
x |
x |
na |
na |
na |
|
af |
x |
x |
x |
x |
x |
x |
x |
x |
x |
x |
x |
na |
na |
na |